
|
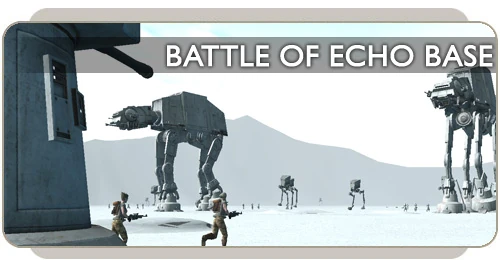
Become a part of a landmark battle in Chapter 11: The Battle of Echo Base! Fight for the Galactic Empire or the Rebel Alliance on the icy fields of Hoth in a Star Wars Galaxies experience unlike any other. This breathtaking heroic encounter puts you at the controls of a Rebel snowspeeder or an Imperial AT-ST as you and your friends jump into the fray at Echo Base.
Make a stand on the north field, destroy the shield generator protecting Echo Base, protect Rebel transports as they escape, and more – all in the newest heroic encounter in Chapter 11!
Choose a side & tips[]
Those sympathetic to the Rebel Alliance or Galactic Empire begin their journey to Hoth at the Adventurers' Guildhall in Aurilia.
Only those who have chosen a side in the Galactic Civil War can take part in the battle, and all group members must be the same faction in order to enter the encounter together.
- Some tips for playing the Echo base instance: you need 4 people in a group to go into the instance, but it is recommended that you take 8 lvl 90's. Be sure to bring commandos, officers, and medics for the best results. The npc's in the instance are all lvl 90 silver or gold elites. Imperals use AT-STs and rebels use snowspeeders. These vehichles are only for players; turrets, AT-AT's and others are npc only.
- Another tip: your group should never split up. It takes a little longer to do the mission, but if you want to live through most of the mission don't split up.
The Empire's ground forces at the battle of Echo Base are commanded by General Maximilian Veers. If you and your allies are Imperial, in this encounter you will support Veers with his task to kill or capture as many of the Rebel personnel as possible before they escape. In addition, the Imperials must act quickly to cut off the supplies of goods and resources to the evacuating Rebel forces.
If you and your group are part of the Rebel Alliance, in this encounter you will assist General Carlist Rieekan and the Rebels stationed at Echo Base with escaping the Imperial onslaught. The ultimate goal of the Rebel Alliance is to evacuate Echo Base with as much manpower and material as can reasonably be preserved.
Depending on where your allegiance lies, you and your fellow adventurers must complete specific goals in this heroic encounter. Each stage of the battle has its own objectives and goals, so keep an eye on both your comm window and the Quest Journal for important updates! The major players of the battle direct you and your team to where you are needed in the fight.
Once you and your allies are ready to fight, the battle begins on the north field.
Fight on the North Battlefield[]

Imperials can use ATSTs

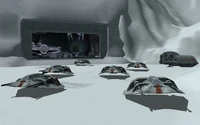
Rebels can pilot a snowspeeder


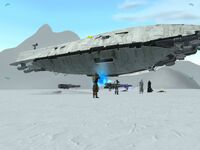
The Battlefield


Imperial might in action

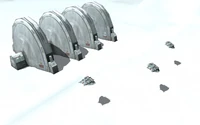
The Shield Generator

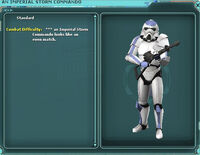
Imperial Storm Commando
The north field is the primary battle line. The Empire is making their move toward the shield generator and the Rebels are trying their utmost to buy time for those still in Echo Base.
Imperial objectives[]
Imperial forces consist of AT-ATs and AT-STs supported by the snowtrooper light infantry. You and your group can commandeer the AT-STs to take on the Rebellion's troops on the ground.
Everyone takes his own ATST, and you spread out in a long line.
Everyone then rushes forward to destroy the three lines of defense. Each line of defense or "LoD" contains NPCS and turrets. Npcs have the usual range of npcs, 35-45m. These and only these can do you damage. Eliminate them fast! Also in each LoD are clumps or batteries of turrets. These have a range of 300 meters and do damage to the ATATs. With your ATSTs having a weapons range of less than 95m you can kill the npcs, then blast the turrets as you run by them. TURRETS MUST GO DOWN FAST! After a LoD is cleared you need to rush to the next one, this is where your "line" comes in, because between each LoD is a randomly spread out line of anti-vechile mines. Touch one and boom...your ATST is done for. For an ATAT...I imagine it won't last much longer. Your line needs to spread out and walk forward, watching for these mines that appear only at 45–35 meters or less range. (I have made a macro myself for the placement of the mines. The locations are not always the same but it gives me a good idea where to look)
It is essential that everyone moves fast, and works semi-independantly and together. For each battery of turrets it helps for the extra firepower with someone helping. NPCS need to be killed first and fast, then the turrets as you move forward to the next line. Your weapons are like commando weapons, they have a AOE affect and will not immediately hit a moving target. Hit the turret a few times till the npcs have finally rushed you and are stationary, then switch back to them and kill them. Once the npcs are done, then move on to the turrets.
Ignore the snowspeeders till all the turrets are done. They are impossible to hit while flying (best chances are when they are turning around as they remain stationary long enough to get a hit or two off) and its best to do it at the end when your waiting for the ATATs to catch up. A good team will finish all three LoD's in a very short time, with almost 5 minutes of waiting for the ATAT's to catch up and blow the shields.
Rebel objectives[]
A light infantry, fixed turret emplacements, and snowspeeders comprise the Rebel forces defending Echo Base. Ground infantry can do little damage to an AT-AT, so your group's primary concern for the north field is escorting the sapper units into proper position.
Rebel forces can engage the AT-ATs by piloting a snowspeeder on the icy field. Use the radial menu to enter a snowspeeder on the field outside of the Echo Base hangar.
Start with the rear 3 AT-ATs and fly along the back of them performing a figure of 8 until the first one drops which should be the middle one if performed correctly, DO NOT take your finger off the trigger, we have all 8 group members constantly firing from start to finish, thats 120k DPS per shot in the team taking out AT-ST and Imperial NPC spawns as we go. Try to apply fire on the front 3 while moving the formation up the field towards the Shield Generator to avoid the newly spawning AT-AT at the back, don't get to close to the front of the AT-AT, this whole section is about getting your bearings and knowing what is around you.
Snowspeeders are exceedingly important to make a direct impact against AT-ATs; these quick fighters inflict more damage than troops on the ground and need to be protected. Defend the shield generator and take out as many AT-ATs as you can to buy the escaping transports as much time as possible.
Remember there are about 12 snowspeeders, you can go back for a new one when yours is destroyed. If there are no more available, you can still do damage to the at-ats on the ground, remember, you can call vehicles in Hoth. Drive over to one and let the npcs take the aggro and fire away, it wont do much damage, but its better than nothing.
Brawl inside Echo Base[]
Echo Base is a major Rebel stronghold, so there is a significant amount of material vital to the survival of the Alliance located inside the base.
Darth Vader and the Empire are focused on capturing the leaders of the Rebellion as well as any vital information inside. Rebels must concentrate on evading the Imperial attack while continuing to evacuate all personnel with as many supplies as possible.
Imperial objectives[]
With the primary shield generator destroyed, reinforcements are arriving quickly from the Star Destroyers in orbit above. Assist snowtroopers, grenadiers, and squad leaders inside the mazelike caverns of Echo Base to secure the Rebel's supplies in the base.
Vader may look cool, but until you get to the hangar, he's useless. There are tons of npcs at the bottom of the first elevator, make sure you're buffed up before you go down.
Infiltrate and disable the command center inside the base to deal a major blow to the Rebellion's evacuation efforts.
Take the Medical Center quickly, this will allow you to clone there, instead of outside the base, this will save you alot of walking. Spies can use stealth to move ahead of the group and complete the objectives: destroy crates, take out bombs in the command center and intercept rebel supply carriers before the rest of the team arrives.
It is important to keep in mind that all the crates at all locations must be destroyed' for the last stage of the instance to start'. Otherwise the instance will get 'stuck' after the troops secure the hangar bay, until all crates are destroyed.
Rebel objectives[]
Every transport that can get away is a point of victory for the Rebel Alliance, and the more stocked a transport, the better off they will be to continue the fight in the future.
Assist the Rebellion by evacuating as much of the base personnel as possible.
Once you go down the first elevator and get into the junction, I recommend the team splits into two groups of 3 and 5, respectively. The team of 5 will go right, clearing the medical center and carving a path for the npcs to evacuate. The team of 3 will go left, liberating the base. Remember, the Imperial Npcs dont actually take damage until you approach them, despite the fact that they appear to be fighting. This means that you can simply attack them in many places to allow them to be damaged, and the rebel npcs will do the rest, this also means you can allow them to use up their action before you begin combat, since the Imperial npcs here are heavy on specials(hell, the Storm Commandos have stand fast! STAND FAST!)
The Barricades are really useful for ranged professions, when you stand near one, the damage you take is dramatically, and I mean DRAMATICALLY reduced.
A really good strategy here if you don't have a large group or a good group is to have one member pull in one boss and then everyone attack it. Just repeat it every time and you can make it through.
You must act fast if you want to get tokens, however, eventually storm commandos will begin arriving in HUGE numbers, this essentially means that this area of the base is, or is about to be overrun. Unless you have a very large, good group, I do not recommend trying to engage these storm commandos, simply fall back and hold them off of the evacuating npcs for as long as you can.
Victory at the Evacuation Point[]
One of the most vital areas of Echo Base is the evacuation point, a field where the transports and their escorts are taking off to escape the wrath of the Empire. Most of the non-combat personnel have already departed from Hoth, leaving a large concentration of Rebel forces still on the base. Failing all else, this is the last line of defense for the Rebels and the ultimate victory for the Imperials.

Imperial objectives[]
This is your last chance to wreak havoc on the retreating Alliance forces. Imperial snowtroopers may join you in the assault or remain inside the base fighting pockets of resistance.
Concentrate your firepower on the remaining transports and caches of supplies and equipment to make a dent in the Rebels' resources.
Once you go up the elevator, you'll see an Imperial Officer, dont talk to him until your group is all ready, as this starts the final phase. Move up quickly, going right seems to be the best option here. There are 2 phalanx guards and a Phalanx Commander under each transport, once you kill them, the transport becomes attackable.
The Transport takeoff here is NOT on a timer, it depends on the evacuation pilots reaching the transports, a few group members should split off to intercept these while the majority of the group concentrates on destroying the transports.
Rebel objectives[]

Fire at will!
The evacuation point is where the escaping forces of Echo Base make their last stand. Protect the remaining transports at all cost and complete the evacuation of Rebel forces from Hoth. If a transport is destroyed, Rebel personnel assigned to that transport will surrender.
The majority of the group should stay with the rebel defensive lines, the key here is to hold off the imperials for as long as possible, you CANNOT defeat all of them. Once the AT-STs show up, you should begin to watch for imperial npcs slipping through, if any do, send a tank or two to take the mobs out, even a single mob of Snowtroopers that gets by can easily screw up your plans here.

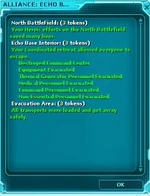
Depending if the various objectives are completed or not, totally or partially, the group members will be awarded from 0 to 9 Echo Base Token of Heroism for a single run.
Getting all objectives completed rewards each groupmate with 9 tokens and the Champion of Echo Base badge, as well as a Painting called Battle of Echo Base, it's called a Flawless Victory.
If you have any time left after you're done, you can go back to do collections and the wampa valley side quest, the entrance to which is located between the medical center and the subzero cantina. You must kill the Wampa Berserker to enter.
Collections[]
- Echo Base Sharpshooter (Imperial)
- Echo Base Sharpshooter (Rebel)
- Hoth Meteorites
- Malfunctioning Probe Droids
- Chilling Preservation
Loots[]
- Junk Loot
- A broken Pressure Pump
- A Disabled Navigation Module
- A Human Skull
- A Poison Canister
- A Rebel Clearance Badge
- A Rebel Medic Kit
- A Repair Kit
- A Ruptured Tauntaun Stomach
- A Small Missile Crate
- A Tauntaun Heart
- An Ammunition Crate
- An Empty Crate
- An Imperial Ration Kit
- An Infected Wampa Liver
- AT-AT Movement Control Module
- AT-AT Seam Sealant
- Corrupt Data Disk
- Tauntaun Bones
- Tauntaun Skull and Bones
- Unidentified Bones
- Storyteller Tokens
- Hoth-style Cable Box 01 (Storyteller Token)
- Hoth-style Cable Box 02 (Storyteller Token)
- Hoth-style Cable Box 03 (Storyteller Token)
- Hoth-style Crate 01 (Storyteller Token)
- Hoth-style Crate 02 (Storyteller Token)
- Hoth-style Crate 03 (Storyteller Token)
- Hoth-style Icicle (Storyteller Token)
- Hoth-style Icicle Cluster 01 (Storyteller Token)
- Hoth-style Icicle Cluster 02 (Storyteller Token)
- Hoth-style Radio (Storyteller Token)
- Hoth-style Scaffold (Storyteller Token)
- Hoth-style Snow Trooper Gun (Storyteller Token)
- Hoth-style Standing Lights (Storyteller Token)
- Hoth-style Terminal (Storyteller Token)
- Hoth-style Toolbox (Storyteller Token)
- Imperial Snowtrooper (Storyteller Token)
- Rebel Snow Trooper (Storyteller Token)
- Wampa (Storyteller Token)
- Weapons
- Wearables
Purchasable Rewards[]
Your factional Hoth contact in Aurilia will trade you rewards for your Echo Base Token of Heroism.
- Instant Travel Vehicle
- Lightsaber Crystal
See also[]
- The Wampa Valley side quest